Make Your Virtual Personal Assistant
Google, Apple and Amazon launched her AI Devices like: Google Home, Apple home, Alexa, but main problem is all of them are so expansive
in this post i am talking about making your own AI assistant with google assistant and amazon Alexa.
What You’ll Need
As you’d expect, you’ll need a Raspberry Pi alongside a handful of parts:- A Raspberry Pi 3 (recommended) or Raspberry Pi 2 (you’ll also need a USB Wi-FI adapter with the Model 2) with Raspbian installed. If you haven’t installed Raspbian before, our guide covers everything you need to know.
- A MicroUSB power cable
- An 8GB MicroSD card
- A USB Microphone (I used this cheap $6 mic, but pretty much any USB mic seems to work. The $8 Playstation Eye seems to work especially well if you’re looking for a slight upgrade)
- Speakers (any powered speaker does the job, I decided to use a UE Mini Boom because I already owned it and even when it’s plugged into the Pi, it still works as a Bluetooth speaker)
- A Keyboard and Mouse for setup (or access to a computer with VNC)
Step One: Register for an Amazon Developer Account
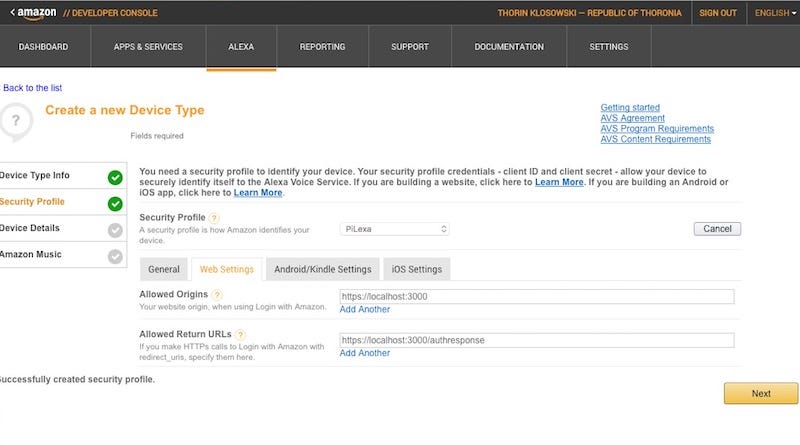
Before you do anything, you’ll need to register for a free Amazon Developer Account, then create a profile for your DIY Echo. This is pretty straightforward:
- Log into your Amazon Developer Account.
- Click on the Alexa Tab.
- Click Register a Product Type > Device.
- Name your device type and display name (We chose “Raspberry Pi” for both).
- Click Next.
- On the Security Profile screen, slick “Create new profile.”
- Under the General tab, next to “Security Profile Name” name your profile. Do the same for the description. Click Next.
- Make a note of the Product ID, Client ID, and Client Secret that the site generates for you.
- Click the Web Settings tab, then click the Edit button next to the profile dropdown.
- Next to Allowed Origins, click, “Add Another” and type in:
https://localhost:3000. - Next to Allowed Return URLs, click “Add Another” and type in:
https://localhost:3000/authresponseClick Next when you’re done. - The Device Details tab is next. It doesn’t matter much what you enter here. Pick a category, write a description, pick an expected timeline, and enter a 0 on the form next to how many devices you plan on using this on. Click Next.
- Finally, you can choose to add in Amazon Music here. This does not work on the Pi powered device, so leave it checked as “No.” Click Save.
Step Two: Clone and Install Alexa

- Open the Terminal application on the Raspberry Pi and type:
cd Desktopand press Enter. - Type in
git clone https://github.com/alexa/alexa-avs-sample-app.gitand press Enter. - Once that’s complete, type in:
cd ~/Desktop/alexa-avs-sample-appand press Enter. - Type in
nano automated_install.shand press Enter. - This
pulls up your text editor. Here, you’ll need to enter your ProductID,
ClientID, and ClientSecret that you notes in the step above. Use the
arrow keys to navigate to each entry. Enter each detail after the
=sign as noted in the image above. When you’re done, tap CTRL+X to save and exit. - You’re now back at the command line. It’s time to run the install script. Type in
cd ~/Desktop/alexa-avs-sample-appand press Enter. - Type in
. automated_install.shand press Enter. - When prompted, press Y for the different questions, and answer as you see fit for the rest. This will configure your Pi and install some extra software. This can take up to 30 minutes, so just let it do it’s thing.
Step Three: Run the Alexa Web Service
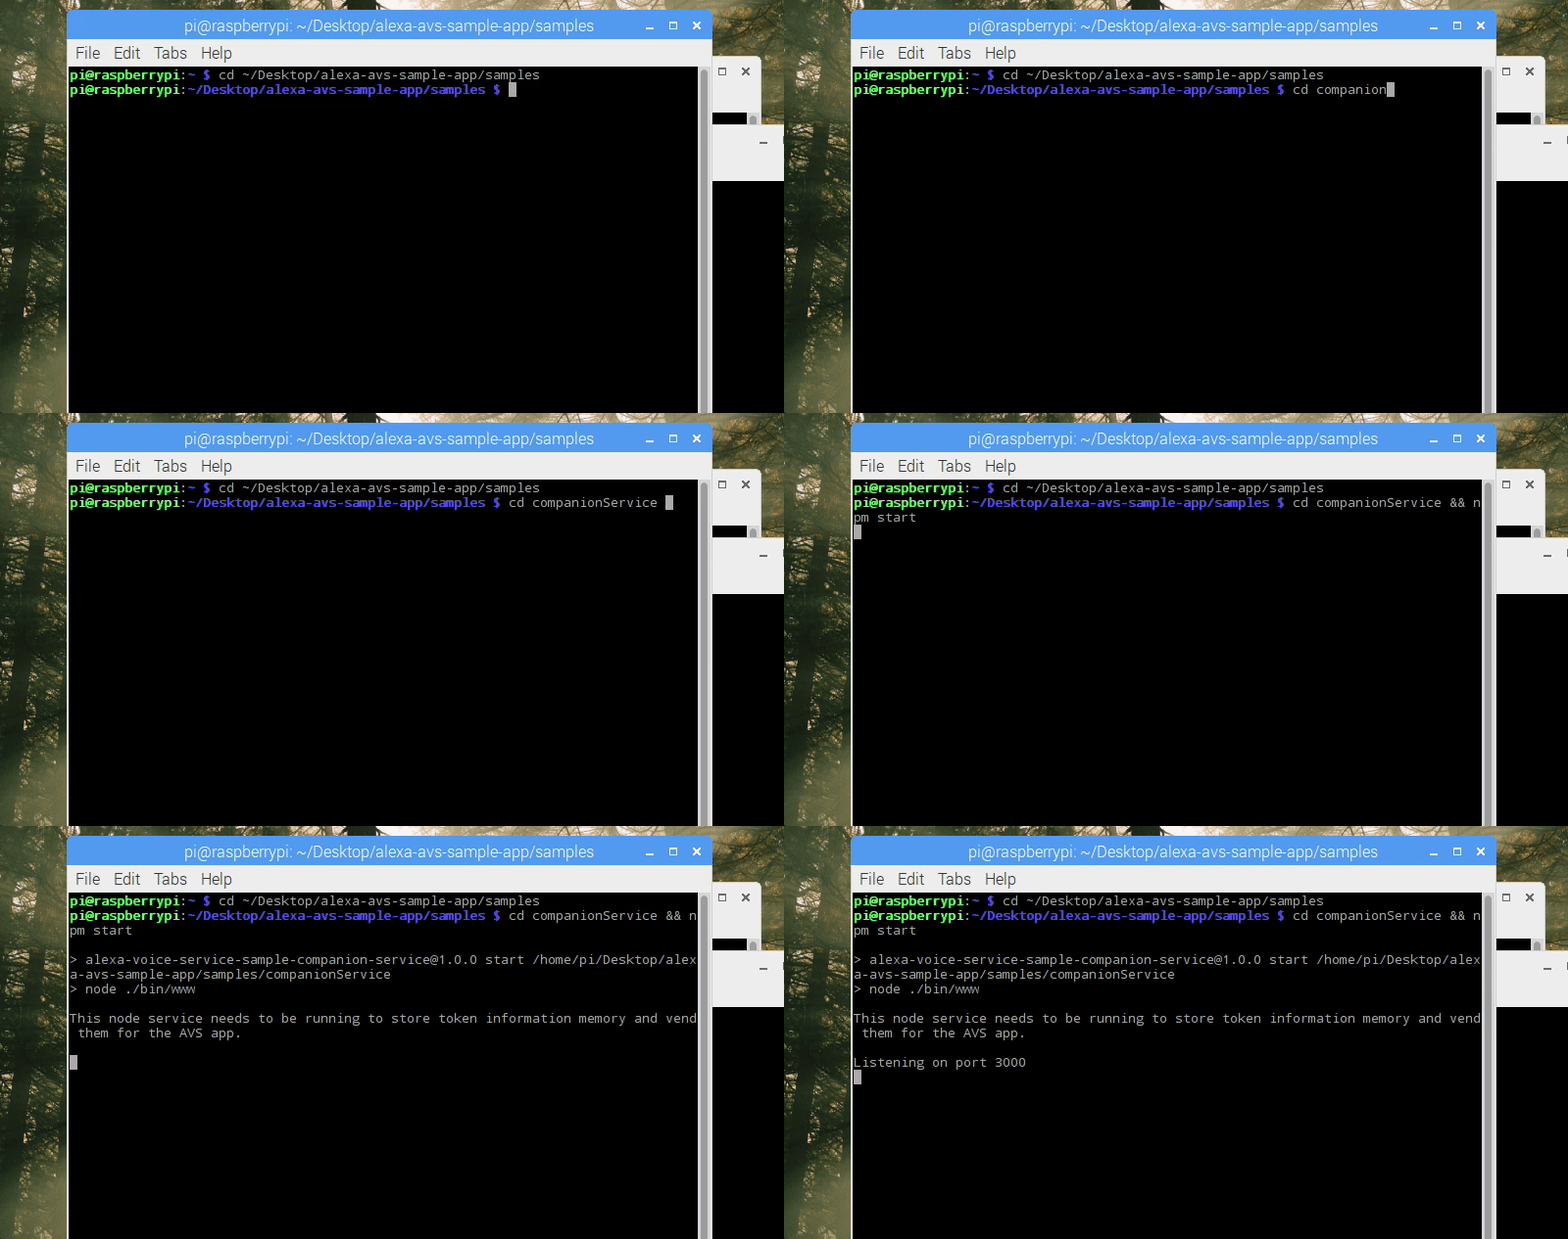
The first one you’ll start is the Alexa Web Service:
- Type in
cd ~/Desktop/alexa-avs-sample-app/samplesand press Enter. - Type in
cd companionService && npm startand press Enter.
Step Four: Run the Sample App and Confirm Your Account
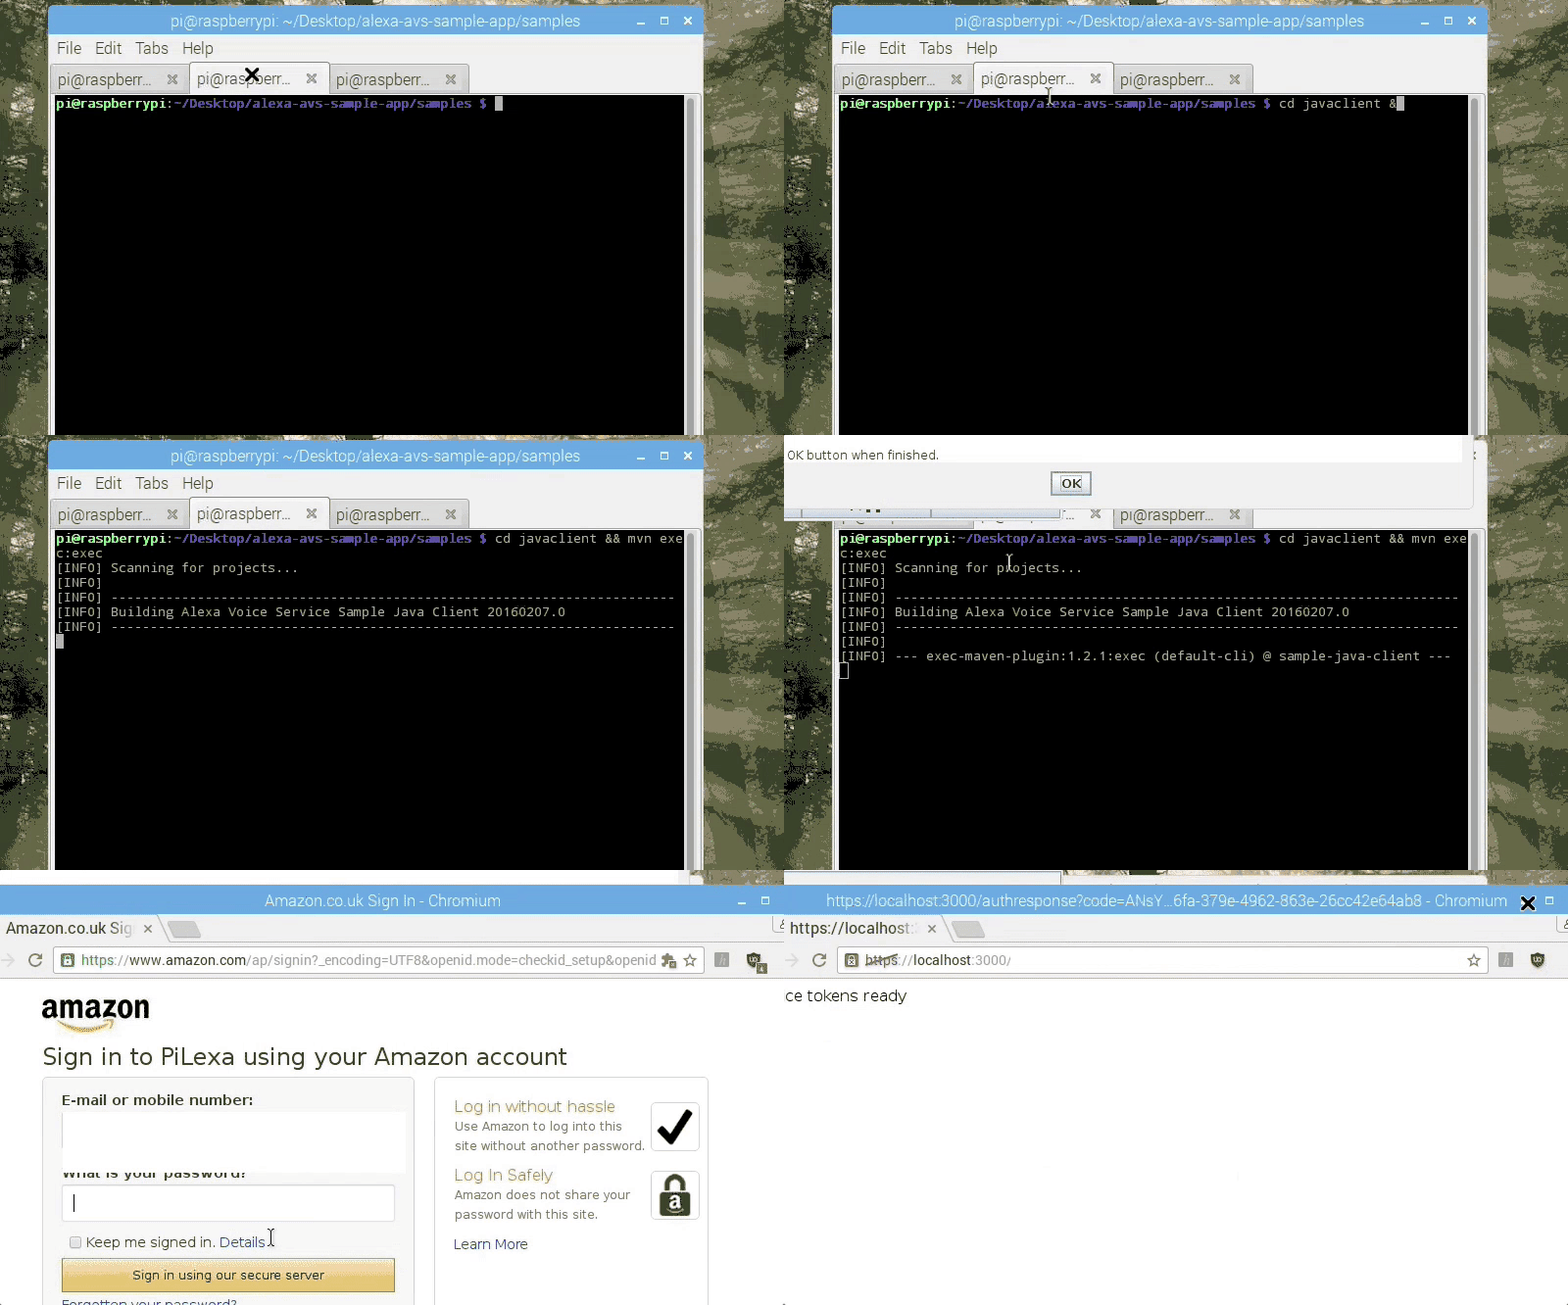
- In your new Terminal window type in
cd ~/Desktop/alexa-avs-sample-app/samplesand press Enter. - Type in
cd javaclient && mvn exec:execand press Enter. - A window will pop up asking you to authenticate your device. Click Yes. This opens up a browser window. A second pop-up will appear in the Java app asking you to click Ok. Do not click this yet.
- Log into your Amazon account in the browser.
- You’ll see an authentication screen for your device. Click Okay. Your browser will now display “device tokens ready.”
- You can now Click the Ok pop-up in the Java app.
Step Five: Start Your Wake Word Engine

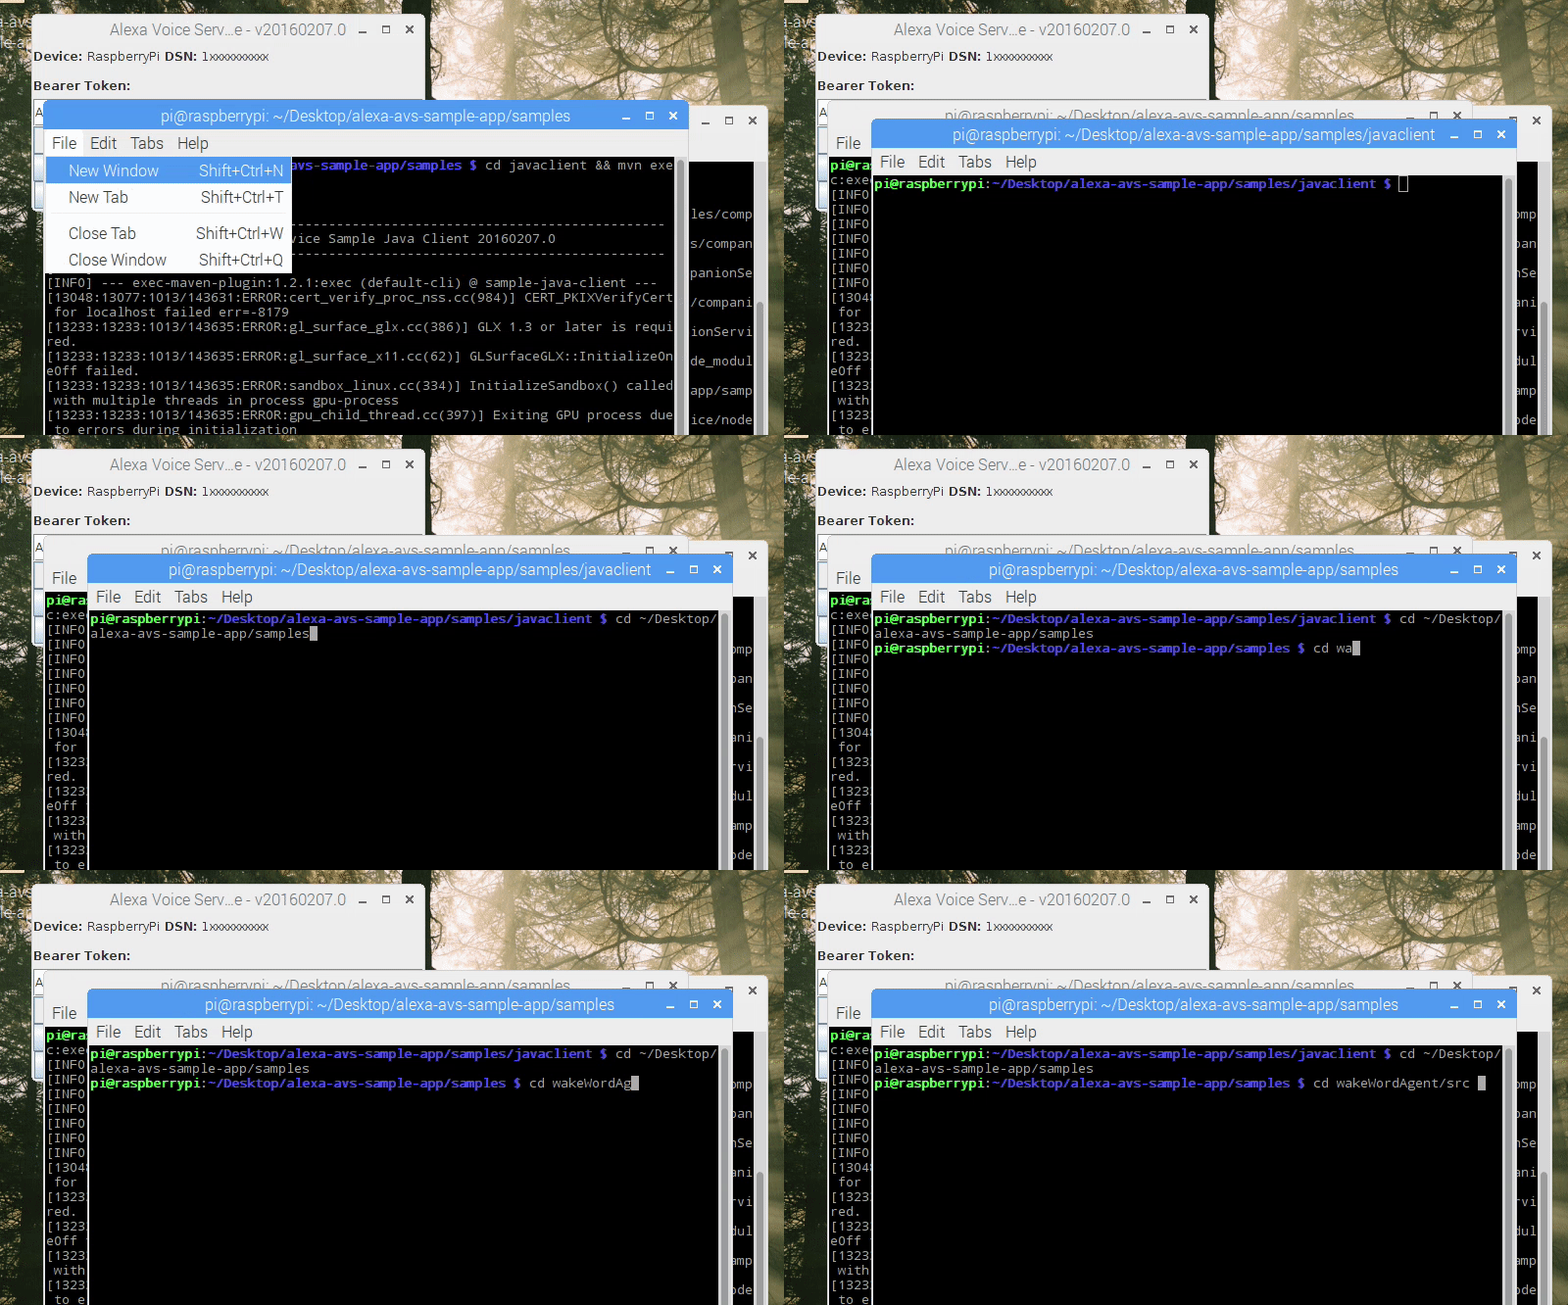
Finally, open a third Terminal window (File > New Window). Here, you’ll start the wake word engine. This makes it so you can say “Alexa” to make your Raspberry Pi start listening to you. You have two options for wake word software, Sensory and KITT.AI. Both are free, but Sensory expires after 90 days, so let’s use KITT instead:
- Type in
cd ~/Desktop/alexa-avs-sample-app/samplesand press Enter. - Type in
cd wakeWordAgent/src && ./wakeWordAgent -e kitt_ai
Step six: autostart Amazon alexa-avs-sample-app on boot
Install the alexa-avs-sample-app and first make sure that it is working fine and after that follow the guidelines given below.- Clone the git using:
git clone https://github.com/shivasiddharth/headless-alexa-avs-sample-app
- Check and verify the path of the installed alexa-avs-sample-app in the clientstart.sh, companionstart.sh and wakeword.sh scripts placed inside the /home/pi/headless-alexa-avs-sample-app/scripts directory.
- Make the installer executable using:
sudo chmod +x /home/pi/headless-alexa-avs-sample-app/installer.sh
- Execute the installer:
sudo /home/pi/headless-alexa-avs-sample-app/installer.sh
in next post i am teaching you how you can install google assistant on your rpi3
by sujeet kumar

Such a great post! It looks like a blog and in this content was useful for freshers. Keeping a good job.
Tableau Training in Chennai
Tableau Course in Chennai
Pega Training in Chennai
Excel Training in Chennai
Power BI Training in Chennai
Oracle Training in Chennai
Unix Training in Chennai
Tableau Training in Chennai
Tableau Course in Chennai
I am obliged to you for sharing this piece of information here and updating us with your resourceful guidance. Hope this might benefit many learners. Keep sharing this gainful articles and continue updating us.
Python Training in Chennai
Python Course in Chennai
Advanced Java Training in Chennai
Hadoop Course in Chennai
Big Data Analytics Courses in Chennai
Big Data Course in Chennai
Selenium Training in Chennai
Python Training in Tambaram